Tuesday, April 28, 2009

Be Very Careful with iPhone Mobile Provisioning

I have a new Mac Book Pro and have screwed it up twice by not carefully following instructions. I have been developing for iPhone with my iMac and wanted to be able to do the same on the MBP. At the end of both attempts my MBP could not see the iPhone, not even in iTunes. A reload of OS-X will bring the devices back, but may have other consequenses. I ultimately re-imaged my system and started over. Read on to avoid my pain.

The secret is to carefully, slowly follow the instructions.

This is super high level description, please read the Apple links below, they have the step-by-step instructions

These operations in the following order worked for me:
  1. Import private key for certificate - installed private key (double click *.p12 - add to login)
  2. Import certificate - installed cert - double click on *.cer - add to login
  3. Import mobile provision - drag and drop .mobileprovision file on to the xcode icon on the doc
Hints: store the above three files some where safe from destruction and prying hands. (Apple suggests an encrypted DMG)


I followed these steps:
1. Get your private key: http://developer.apple.com/iPhone/library/documentation/Xcode/Conceptual/iphone_development/128-Managing_Devices/devices.html#//apple_ref/doc/uid/TP40007959-CH4-SW8
2. Dev Certificate and Mobile provision: http://developer.apple.com/iPhone/library/documentation/Xcode/Conceptual/iphone_development/128-Managing_Devices/devices.html#//apple_ref/doc/uid/TP40007959-CH4-SW42

Tuesday, April 21, 2009

Home and End keys in Eclipse 3.4

Eclipse doesn't honor the OS wide key dictionary settings. This URL has a little info - http://www.kelek.com/blog/2006/09/16/fixing_home_end.html

However those instructions are for eclipse 3.2. In eclipse 3.4 do the following:

In Preferences|General|Keys
Home/End of line
  1. Find the 'Line End' command (use the filter)
  2. Copy the command (copy btn) - select the new version of the command.
  3. Click in the 'Binding' edit box.
  4. Hit the 'End' key
  5. Choose 'Editing Text' in the the 'When' combo-box.
Fix Text Selection
  1. Find the 'Select Line End' command
  2. Make sure it is selected and click the 'Copy' btn.
  3. Get focus in the 'Binding' edit box.
  4. Type a Shift+End
  5. Change 'Windows' to 'Editing Text' in the the 'When' combo-box.
Rinse & Repeat for Home - it's key commands are 'Line Start' and 'Select Line Start'

Home/End of text
  1. Find the 'Text End' command (use the filter)
  2. Copy the command (copy btn) - select the new version of the command.
  3. Click in the 'Binding' edit box.
  4. type ctrl+end
  5. Choose 'Editing Text' in the the 'When' combo-box.
Fix Text Selection
  1. Find the 'Select Text End' command
  2. Make sure it is selected and click the 'Copy' btn.
  3. Get focus in the 'Binding' edit box.
  4. Type a Ctrl+Shift+End
  5. Change 'Windows' to 'Editing Text' in the the 'When' combo-box.
Rinse & Repeat for Home - it's key commands are 'Text Start' and 'Select Text Start'

If anybody knows where this config info is saved please comment and I'll drop the file somewhere so people can just d/l it. I couldn't find it in my workspace settings.

Sunday, April 5, 2009

How to get the IP address of an iPhone OS v2.2.1

Lately I have been struggling with an iPhone OS 2.2.1 app that needs to know the WiFi IP address of the iPhone. Unfortunately at the time the app runs it does not have internet access and thus I cannot use whatismyip.com.

With thanks to Erica Sadun (iPhone cookbook) and gandreas and valexa on the iPhone dev forums I was able to create the following function. The function iterates over the IPs of the phone using getifaddrs(&addrs). if getWiFiIPAddress finds "en0" in the list interface addresses (ifaddrs) it will return the ethernet adapter zero (en0) IP address as a NSSring*. If no address is found the function will return NULL.


//------- includes

#include <ifaddrs.h>
#include
<arpa/inet.h>
#include <sys/types.h>
#include <sys/socket.h>
#include <net/if.h>
#include <net/if_dl.h>
#include <arpa/inet.h>
#include <ifaddrs.h>

#if ! defined(IFT_ETHER)
#define IFT_ETHER 0x6/* Ethernet CSMACD */
#endif


//------- Implementation

- (NSString*)getWiFiIPAddress
{

BOOL success;
struct ifaddrs * addrs;
const struct ifaddrs * cursor;

success = getifaddrs(&addrs) == 0;
if (success) {
cursor = addrs;
while (cursor != NULL) {
if (cursor->ifa_addr->sa_family == AF_INET && (cursor->ifa_flags & IFF_LOOPBACK) == 0) // this second test keeps from picking up the loopback address
{
NSString *name = [NSString stringWithUTF8String:cursor->ifa_name];
if ([name isEqualToString:@"en0"]) { // found the WiFi adapter
return [NSString stringWithUTF8String:inet_ntoa(((struct sockaddr_in *)cursor->ifa_addr)->sin_addr)];
}
}

cursor = cursor->ifa_next;
}
freeifaddrs(addrs);
}
return NULL;
}

PS: I need a better blog, that support snippets - comments?

Thursday, April 2, 2009

Doskey like tab completion and various other fixes /power user hacks for the mac console prompt (ctrl-left,right arrow)

Want to have the same keystrokes (plus more) that are seen in M$ command/doskey or cmd on the mac console? Especially ctrl-left-arrow, ctrl-right-arrow. I did. Many years ago (Slackware v2) I started this .inputrc and have since updated and translated it for the mac console (Terminal.App).

For additional help "man bash" and search for "bind". You will find the definitions of the commands in .inputrc (i.e. menu-complete). See the links at the end of the included .inputrc for additional help. These instructions are for the console, look here for fixing home and end in regular mac GUI applications: http://www.starryhope.com/tech/2006/mac-os-x-home-and-end-keys/. If your really curious about how all this works, "man stty"

This first part focuses on home and end, I put comments in the .inputrc that will explain all the other cool keystrokes.

Only two Steps:
  1. Change keybindings in Terminal.App
  2. Create/add to .inputrc
___________________________________________________________

1. Change keybindings in Terminal.App
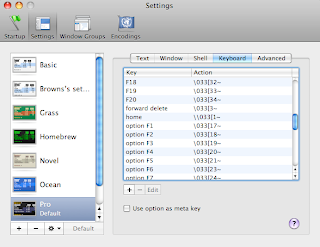
Goto Terminal's Preferences. Select Keyboard. Find the end key and click Edit. Change the end key's action to "send to string to shell". You'll notice that backspace/delete do not work properly. Use the Delete One Character button to backspace. Set the string to "\\033[4~"

I had some issues typing the "\" character in the string to send edit box so I cut-n-pasted from some other random key and just changed the trailing end of the keycode.

Do the same thing for the home key, except use "\\033[1~". When your done Terminal's preference's should look something like this:

2. Drop this into ~/.inputrc -----------------------------------BOF
#"\e[11~": "Function Key 1"
#"\e[12~": "Function Key 2"
#"\e[13~": "Function Key 3"

#"\e[14~": "Function Key 4"
#"\e[15~": "Function Key 5"
#"\e[17~": "Function Key 6"
#"\e[18~": "Function Key 7"
#"\e[19~": "Function Key 8"
#"\e[20~": "Function Key 9"
#"\e[21~": "Function Key 10"

# For Bash, all terminals, add some Bash specific hacks.
$if Bash
"\C-xv": show-bash-version
"\C-x\C-e": shell-expand-line


### fix delete key
"\e[3~": delete-char

## END key -- MAC must be remapped in Terminal options (keyboard) "\033[4~"
"\e[4~":end-of-line
## HOME key -- MAC must be remapped in Terminal options (keyboard) "\033[1~"
"\e[1~": beginning-of-line

$endif

# For FTP, different hacks:
$if Ftp
"\C-xg": "get \M-?"
"\C-xt": "put \M-?"
"\M-.": yank-last-arg
$endif

" ": self-insert

$if Bash

# ctrl-backspace - none of this ever worked :( --- use ctrl-w instead (default)
### never worked -->"\e\C-[D": backward-kill-word
### Control-Rubout: backward-kill-word
##Map control-foward-delete to F14 "\033[26~"
##"\e[26~": backward-kill-word


#### doskey like completion
set completion-ignore-case On
"\e[A": history-search-backward
"\e[B": history-search-forward

#### doskey like line movement
#ctrl-left arrow
"\e[5D": backward-word
#ctrl-right arrow
"\e[5C": forward-word


# auto list tab completions
set show-all-if-ambiguous on

# show a filetype indicator in tab completions
set visible-stats on

## tab cycles through completions -- I like the show-all-if-ambiguous instead
#"\t": menu-complete
## shift-tab to reverse cycle complete http://www.tikirobot.net/wp/2006/03/29/reverse-menu-complete-in-bash/
#\C-y: "\e--\C-i"

### didn't like this
#Space: magic-space


$endif

# Include system wide settings which are ignored by default if one has their own .inputrc
$include /etc/inputrc


##helpful sites
#http://codesnippets.joyent.com/tag/inputrc
#http://linuxart.com/log/archives/2005/10/13/super-useful-inputrc/
-----------------------------------EOF


If ~/.inputrc doesn’t work, then you need to add

export INPUTRC=~/.inputrc

to your .bashrc/.bash_profile

If your wondering why I am bother with home/end it's because I use a M$ ergo keyboards on my macs. Why doesn't Apple make one an ergonomic keyboard?


PS: Read-line keys natively work in man mac apps (ctrl+e for end / ctrl+a for end / ctrl+k for kill line, etc)

Wednesday, April 1, 2009

Colorful ls (dircolors) on a mac console (terminal.app)


On linux systems when I listed the contents of a directory (ls) I saw a colorful list. Different colors were used for compressed files, directories, images, etc.


Install GNU coreutils Steps:
  1. Download coreutils (I used v7.2). d/l http://ftp.gnu.org/gnu/coreutils site: http://www.gnu.org/software/coreutils
  2. untar it tar xzvf coreututils-7.2.tar.gz
  3. cd into the coreutils-7.2 directory
  4. ./configure --prefix=/usr
  5. make
  6. make check - (I had 2 test failures, but no problems)
  7. Install all GNU core utils by executing 'sudo make install'
  8. OR just install ls and dircolors, and leave everything else BSD by copying ls & dircolors from ./src to /usr/bin
Setup bash_profile
  1. edit .bash_profile
  2. add these lines
#parses .dircolors and makes env var for GNU ls
eval `dircolors`
alias ls='ls -hF --color=auto'

Setup .dircolors
-------------------------------------BOF .dircolors
# Configuration file for dircolors, a utility to help you set the
# LS_COLORS environment variable used by GNU ls with the --color option.

# The keywords COLOR, OPTIONS, and EIGHTBIT (honored by the
# slackware version of dircolors) are recognized but ignored.

# Below, there should be one TERM entry for each termtype that is colorizable
TERM linux
TERM linux-c
TERM mach-color
TERM console
TERM con132x25
TERM con132x30
TERM con132x43
TERM con132x60
TERM con80x25
TERM con80x28
TERM con80x30
TERM con80x43
TERM con80x50
TERM con80x60
TERM xterm
TERM xterm-debian
TERM rxvt
TERM screen
TERM screen-w
TERM vt100

# Below are the color init strings for the basic file types. A color init
# string consists of one or more of the following numeric codes:
# Attribute codes:
# 00=none 01=bold 04=underscore 05=blink 07=reverse 08=concealed
# Text color codes:
# 30=black 31=red 32=green 33=yellow 34=blue 35=magenta 36=cyan 37=white
# Background color codes:
# 40=black 41=red 42=green 43=yellow 44=blue 45=magenta 46=cyan 47=white
NORMAL 00 # global default, although everything should be something.
FILE 00 # normal file
DIR 01;34 # directory
LINK 01;36 # symbolic link. (If you set this to 'target' instead of a
# numerical value, the color is as for the file pointed to.)
FIFO 40;33 # pipe
SOCK 01;35 # socket
DOOR 01;35 # door
BLK 40;33;01 # block device driver
CHR 40;33;01 # character device driver
ORPHAN 40;31;01 # symlink to nonexistent file

# This is for files with execute permission:
EXEC 01;32

# List any file extensions like '.gz' or '.tar' that you would like ls
# to colorize below. Put the extension, a space, and the color init string.
# (and any comments you want to add after a '#')

# If you use DOS-style suffixes, you may want to uncomment the following:
#.cmd 01;32 # executables (bright green)
#.exe 01;32
#.com 01;32
#.btm 01;32
#.bat 01;32

.tar 01;31 # archives or compressed (bright red)
.tgz 01;31
.arj 01;31
.taz 01;31
.lzh 01;31
.zip 01;31
.z 01;31
.Z 01;31
.gz 01;31
.bz2 01;31
.deb 01;31
.rpm 01;31
.jar 01;31
.dmg 01;31

# image formats
.jpg 01;35
.png 01;35
.gif 01;35
.bmp 01;35
.ppm 01;35
.tga 01;35
.xbm 01;35
.xpm 01;35
.tif 01;35
.png 01;35
.mpg 01;35
.avi 01;35
.fli 01;35
.gl 01;35
.dl 01;35
------------------------------------------------EOF .dircolors

All Done, type ls at a console prompt and your golden, or purple(directories), green(executables), etc...

- mattb

PS: Once an Apple update, updated ls, not problems, just remake and reinstall
PPS: A friend reminded me that if you want to keep BSD ls on your mac, you can simply alias ls='ls- -G' It is not as configurable that I know, but anything is better than colorless